Do it now - sometimes LATER becomes NEVER.
post @ 2017-10-12

前提准备:一个kali安装盘
问题:U盘安装kali总会失败,多次停留在grub的update-grub进度条上
解决方案

  • 停留在update-grub时强制关机,然后重新用U盘启动,并选择live安装方式。
  • 进入kali系统,在终端输入如下命令安装grub(千万记住你的kali是在哪个盘的,比如我的是在sda):
Read More
post @ 2017-09-16
  1. 先去GitHub下载源码.

UOFTx.png

  1. 将下载好的压缩包解压
  2. 进行环境的检测和安装路径的设置(在解压后的文件内使用终端)

    1
    $./configure --prefix=/opt/local --with-features=huge --enable-pythoninterp=yes --enable-multibyte --with-vim-name=vim --with-python-config-dir=/usr/lib/python2.7/config
Read More
post @ 2017-09-15

参考了知乎的文章使用hexo,换了电脑怎么怎么更新博客

装nodejs,npm,hexo(unix自带git)

  • 下载安装nodejs

  • 安装hexo:

    1
    $npm i -g hexo
  • 在适当文件夹,初始化hexo

    1
    $hexo init
Read More
post @ 2017-09-07

vim作为轻量级的文本编辑器拥有众多特性:

  • 跨平台及统一环境
    无论是在windows还是在*nix,vim是一个很完美的跨平台文本编辑器,甚至可以直接在服务器平台CentOS,Ubuntu等直接配置使用,配置文件大同小异,操作习惯基本相同。
  • 定制化及可扩展性
    vim提供一个.vimrc的配置文件来配置vim,并且自己可以定制一些插件可实现高效编辑
  • 高效命令行
    使用Vim,无需用到鼠标,键盘足矣

    配置 .vimrc

    配置vim,需要在home/目录下新建.vimrc文档,那在这里面什么呢?–外观,插件,缩进,键盘映射等;在这里,你可以先参考我的配置文件根据注释,也能大概知道是干什么的.

    安装插件管理工具vundle [vim bundle]

  1. 下载vundle

    1
    $git clone https://github.com/gmarik/vundle.git ~/.vim/bundle/vundle
  2. 在.vimrc中添加/对vundle的支持

    1
    2
    3
    filetype off
    set rtp+=~/.vim/bundle/vundle/
    call vundle#rc()

安装插件

在.vimrc 中安装插件有三种方法:

  • 在Github vim-scripts 用户下的repos,只需要写出repos名称
  • Github其他用户下的repos, 需要写出”用户名/repos名”(常用)
  • 不在Github上的插件,需要写出git全路径

    将安装的插件在~/.vimrc配置

    1
    2
    3
    4
    5
    6
    7
    8
    9
    10
    11
    12
    13
    14
    15
    16
    17
    18
    19
    20
    21
    22
    23
    24
    25
    26
    27
    28
    29
    30
    31
    32
    33
    34
    35
    36
    " Define bundles via Github repos
    Bundle 'christoomey/vim-run-interactive'
    Bundle 'Valloric/YouCompleteMe'
    Bundle 'croaky/vim-colors-github'
    Bundle 'danro/rename.vim'
    Bundle 'majutsushi/tagbar'
    Bundle 'kchmck/vim-coffee-script'
    Bundle 'kien/ctrlp.vim'
    Bundle 'pbrisbin/vim-mkdir'
    Bundle 'scrooloose/syntastic'
    Bundle 'slim-template/vim-slim'
    Bundle 'thoughtbot/vim-rspec'
    Bundle 'tpope/vim-bundler'
    Bundle 'tpope/vim-endwise'
    Bundle 'tpope/vim-fugitive'
    Bundle 'tpope/vim-rails'
    Bundle 'tpope/vim-surround'
    Bundle 'vim-ruby/vim-ruby'
    Bundle 'vim-scripts/ctags.vim'
    Bundle 'vim-scripts/matchit.zip'
    Bundle 'vim-scripts/tComment'
    Bundle "mattn/emmet-vim"
    Bundle "scrooloose/nerdtree"
    Bundle "Lokaltog/vim-powerline"
    Bundle "godlygeek/tabular"
    Bundle "msanders/snipmate.vim"
    Bundle "jelera/vim-javascript-syntax"
    Bundle "altercation/vim-colors-solarized"
    Bundle "othree/html5.vim"
    Bundle "xsbeats/vim-blade"
    Bundle "jiangmiao/auto-pairs"
    Bundle "evanmiller/nginx-vim-syntax"
    Bundle "Lokaltog/vim-easymotion"
    Bundle "tomasr/molokai"
    Bundle "klen/python-mode"
    Bundle 'Raimondi/delimitMate'

打开vim,运行:BundleInstall或者直接在bash中敲入vim +BundleInstall +qall
以上是我的插件配置,若还有什么需要,也可自己添加,然后运行:BundleInstall即可

常用插件

Nerd Tree

NERD Tree(是一个树形目录插件,方便浏览当前目录有哪些目录和文件。
UOi01.png
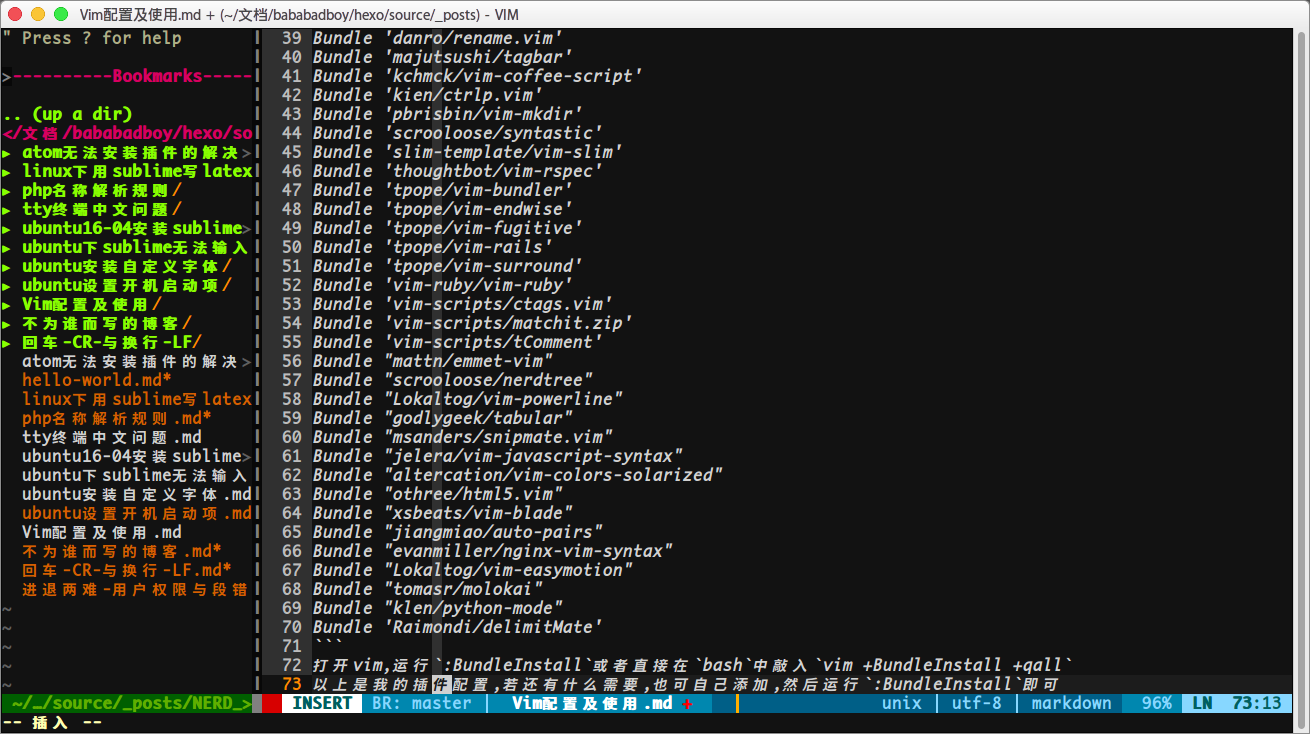
我在~/.vimrc文件中配置NERD Tree,设置一个启用或禁用NERD Tree的键映射

1
nmap <F5> :NERDTreeToggle<cr>

所以你只需按F5键就能启用或禁用NERD Tree,按?可以浏览其使用方法.

auto-pairs

安装的Raimondi/delimitMate,没有用,就转而使用auto-pairs了,作用:对括号之间回车,自动分为3行并调整缩进.在写函数时hin方便的.

Read More
post @ 2017-09-05

准备工作

  • 下载好的字体–.ttf
  • 设置桌面的工具–Unity Tweak Tool

    步骤

  1. 字体文件位于/usr/share/fonts/,在这里新建文件夹并且将.ttf移入
  2. 修改字体权限,确保root以外的普通用户也可以正常使用该字体
  3. 建立字体缓存:

    1
    2
    3
    $sudo mkfontscale
    $sudo mkfontdir
    $sudo fcache -fv
  4. 使用Unity Tweak Tool:预览->外观->字体,选择该字体

Read More
post @ 2017-09-03

写在前面

ubuntu默认有7个tty虚拟机终端,其中tty7启动了xorg的图形界面服务和窗口管理器.但是呢,虚拟机tty终端下的中文显示都是 ◇ 符号,默认也不能输入中文,平常倒没什么事情,一但unity桌面进不去了,tty就大显神威了.听说还有大佬在tty看视频(低头低头)

解决方案

1. 安装fbterm

1
$sudo apt install fbterm

2. 修改fbterm的配置文件 .fbtermc

  • 修改字体及其大小(可选,我觉得原字体太小了)

    1
    font-size = 17
  • 修改编码规则

    1
    text-codings = utf-8
  • 修改输入法,选yong(之前看过有的博客的教程使用 fcitx-fbterm,我试了,不灵…,(;′⌒`)

    1
    input-method = yong

3. 安装小小输入法,小小输入法的网址

  • 修改配置文件 yong.ini

将下载并解压的文件复制到某个目录下,这里将其放在/opt/目录下,然后修改配置yong.ini(注意:必须要先设置好yong.ini,再安装yong,否则就要在用户目录下的.yong/yong.ini中作出修改,而且每个用户都要修改,非常的不方便)

1
2
$cd /opt/yong/
$vim sudo yong.ini
1
2
3
default = 6 #选择适合自己的输入方式
cand = 5 #后选字个数
Cnen = LSHIFT #因个人配置选择
  • 安装小小
1
2
3
$sudo./yong-tool.sh --install   #安装.
$sudo./yong-tool.sh --uninstall #卸载
$sudo./yong-tool.sh --select #将yong设置为默认的输入法

使用(tty下)

1
$sudo fbterm

这时候tty就能在虚拟控制台fbterm的帮助下,输入输出中文,终于可以和 ◇ 说再见了O(∩_∩)O~.
ULTyj.png

Read More

注意

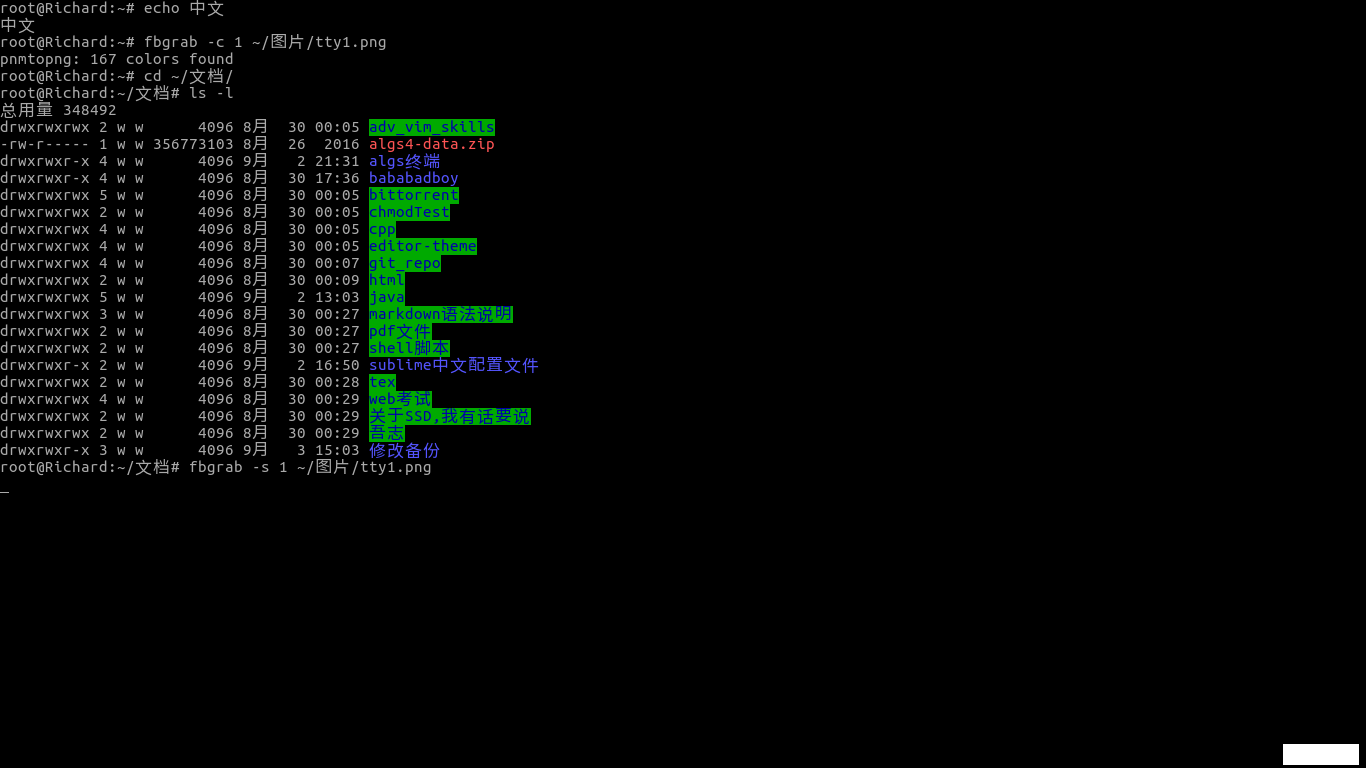
此方法不适合由Ubuntu16.04安装sublime解决方案中 #方案一# 提供的安装sublime_text_3的方法.

解决方案

保存下述代码为sublime-imfix.c文件

1
2
3
4
5
6
7
8
9
10
11
12
13
14
15
16
17
18
19
20
21
22
23
24
25
26
27
28
29
30
31
32
33
34
35
36
37
38
39
40
41
42
43
44
45
46
47
48
49
50
51
52
53
54
55
56
57
58
59
60
61
62
63
64
65
66
67
68
69
70
71
72
73
74
75
76
77
78
79
/*
sublime-imfix.c
Use LD_PRELOAD to interpose some function to fix sublime input method support for linux.
By Cjacker Huang

gcc -shared -o libsublime-imfix.so sublime-imfix.c `pkg-config --libs --cflags gtk+-2.0` -fPIC
LD_PRELOAD=./libsublime-imfix.so subl
*/
#include <gtk/gtk.h>
#include <gdk/gdkx.h>
typedef GdkSegment GdkRegionBox;

struct _GdkRegion
{
long size;
long numRects;
GdkRegionBox *rects;
GdkRegionBox extents;
};

GtkIMContext *local_context;

void
gdk_region_get_clipbox (const GdkRegion *region,
GdkRectangle *rectangle)
{
g_return_if_fail (region != NULL);
g_return_if_fail (rectangle != NULL);

rectangle->x = region->extents.x1;
rectangle->y = region->extents.y1;
rectangle->width = region->extents.x2 - region->extents.x1;
rectangle->height = region->extents.y2 - region->extents.y1;
GdkRectangle rect;
rect.x = rectangle->x;
rect.y = rectangle->y;
rect.width = 0;
rect.height = rectangle->height;
//The caret width is 2;
//Maybe sometimes we will make a mistake, but for most of the time, it should be the caret.
if(rectangle->width == 2 && GTK_IS_IM_CONTEXT(local_context)) {
gtk_im_context_set_cursor_location(local_context, rectangle);
}
}

//this is needed, for example, if you input something in file dialog and return back the edit area
//context will lost, so here we set it again.

static GdkFilterReturn event_filter (GdkXEvent *xevent, GdkEvent *event, gpointer im_context)
{
XEvent *xev = (XEvent *)xevent;
if(xev->type == KeyRelease && GTK_IS_IM_CONTEXT(im_context)) {
GdkWindow * win = g_object_get_data(G_OBJECT(im_context),"window");
if(GDK_IS_WINDOW(win))
gtk_im_context_set_client_window(im_context, win);
}
return GDK_FILTER_CONTINUE;
}

void gtk_im_context_set_client_window (GtkIMContext *context,
GdkWindow *window)
{
GtkIMContextClass *klass;
g_return_if_fail (GTK_IS_IM_CONTEXT (context));
klass = GTK_IM_CONTEXT_GET_CLASS (context);
if (klass->set_client_window)
klass->set_client_window (context, window);

if(!GDK_IS_WINDOW (window))
return;
g_object_set_data(G_OBJECT(context),"window",window);
int width = gdk_window_get_width(window);
int height = gdk_window_get_height(window);
if(width != 0 && height !=0) {
gtk_im_context_focus_in(context);
local_context = context;
}
gdk_window_add_filter (window, event_filter, context);
}

安装C/C++的编译环境和 gtk libgtk2.0-dev

1
2
$sudo apt-get install build-essential
$sudo apt-get install libgtk2.0-dev

编译共享内库

1
$gcc -shared -o libsublime-imfix.so sublime-imfix.c `pkg-config --libs --cflags gtk+-2.0` -fPIC

将libsublime-imfix.so 拷贝到sublime_text所在文件夹

1
$sudo cp libsublime-imfix.so /opt/sublime_text/

修改文件/usr/bin/sublime

1
$sudo vim /usr/bin/subl


1
2
#!/bin/sh
exec /opt/sublime_text/sublime_text "$@"

改为

1
2
#!/bin/sh
LD_PRELOAD=/opt/sublime_text/libsublime-imfix.so exec /opt/sublime_text/sublime_text "$@"

后续问题

你会发现通过终端打开的sublimeText3,preferences->packages browse…无法打开了…我…真是天灭Ubuntu

Read More
post @ 2017-09-01

sublime是一款非常流行的代码编辑器,它拥有漂亮的用户界面和强大的功能,支持迷你地图,多选择,python插件,代码高亮,收起等等.Sublime是收费软件,一个license 70美元,但是不购买license也可以用。它提供了无限期试用,并且试用版和注册版的功能相同,无任何限制,只是偶尔在保存的时候会弹出注册提示框。

方案一(类似于绿色软件)

下载tar包:https://www.sublimetext.com/3

1
$wget https://www.sublimetext.com/sublime_text_3_build_3114_x64.tar.bz2

解压即可用:

1
2
3
$tar xvf sublime_text_3_build_3114_x64.tar.bz2
$cd sublime_text_3/
$./sublime_text

方案二

使用第三方源安装:

1
2
3
4
$sudo add-apt-repository ppa:webupd8team/sublime-text-3
$sudo apt-get update
$sudo apt-get install sublime-text-installer
$subl

如果你还要按照这个教程解决sublime-text-3中文输入问题,个人建议使用方案二

Read More

方案一

Atom官方插件库,搜索所需插件,进入插件的Github仓库,clone该项目到你的Atom插件目录(Win: C:\Users\你的用户名.atom\packages,Mac: ~/.atom/packages),然后cd到该插件目录下,执行 npm install,安装完成。

Read More
post @ 2017-08-28

配置 Tex Live

1.下载 Tex Live 2017.iso

TeX Live 的当前版本是 2017,你可以从官方站点下载它们的安装包。点击下列链接,将会「自动选择」距离你最近的镜像下载.
http://mirror.ctan.org/systems/texlive/Images/texlive2017.iso
–蛋酥.如果你身处中国大陆,发现下载速度很慢,可以尝试清华大学和中国科技大学的镜像站.
https://mirrors.tuna.tsinghua.edu.cn/CTAN/systems/texlive/Images/texlive2017.iso
https://mirrors.ustc.edu.cn/CTAN/systems/texlive/Images/texlive2017.iso
选择其一即可,大小3.7G,有点方

1
$wget https://mirrors.ustc.edu.cn/CTAN/systems/texlive/Images/texlive2017.iso

Read More
⬆︎TOP